Oak Programming Tutorial for Windows
Introduction
This document aims at learning user to use the Toradex OakLib programming library to communicate with their Toradex Oak sensors under Windows.
Requirements
To complete this tutorial, you will need:
- A Toradex Oak sensor. In this tutorial we will use the Oak Pressure sensor, but with a few adaptations, any Oak sensor can be used.
- A computer running Windows XP or Windows Vista.
- Visual C++ Express, version 2008 or above: this is the free version of the popular Visual Studio development environment. You can download it at no charge directly from Microsoft website. If you have other versions of Visual Studio, you should have no problem following this tutorial.
- A good knowledge of C++. We will not use much of the additions of C++ to C, so C programming should be able to follow this tutorial.
- Some experience with using the Microsoft Visual Studio environment. If you have never used Visual Studio, you should start by reading some dedicated documentation.
- A copy of the Toradex OakLib library, the Oak Programming Guide and the datasheet for your Oak sensor. You can download these from the Oak page on the Toradex website.
Setup
Before we start, Make sure that you have installed Microsoft Visual C++ Express 2008. We will use this version because it is a free version of the Microsoft Visual Studio Development environment, which is the most widespread development environment for Windows. We will spend most of our time in Visual C++ Express, so if you have never used it, it is probably a good idea to start by learning how to use this environment.
The free Express version of Visual C++ has some limitation, but they are not problematic for this tutorial.
What are we going to do?
In the first part of the tutorial, we will create a new Visual C++ project, set up the OakLib library, and write the simplest Oak useful Oak application possible: a command-line program that reads the state of the device at a regular interval and display the read values.
In the second part, we will have a look at the other features of the Oak sensors, like setting the device and channel names, changing the sampling rate, modifying the led blink mode, etc...
Creating the project
Launch Visual C++ Express, then in the application menu, select File → New → Project... Fill the dialog that appears as in the screenshot below:

- Project Type: Visual C++ → Win32
- Templates: Win32 Console Application
- Name: OakTutorial
- Location: C:\Code
- Create directory for solution: unchecked
Note: you can select a different location that suits you better. In this tutorial, we will assume that you selected C:\Code.
Once you're done, click the OK button. A new dialog will appear, click Next, then fill the next dialog according to the following screenshot:
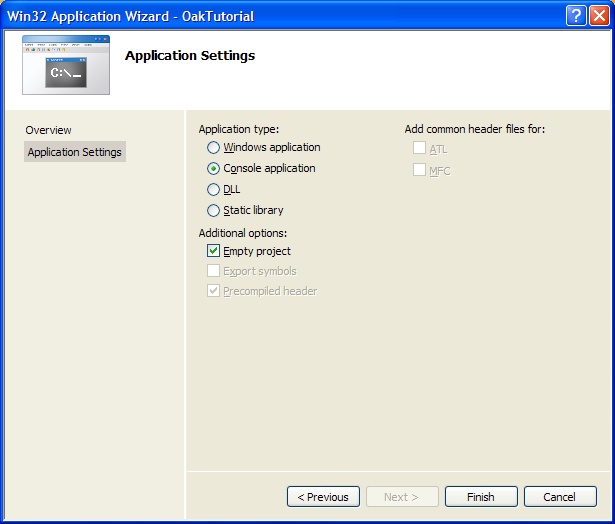
- Application Type: Console application
- Additional Options: Check Empty project
Once done, click Finish. You now have created a new empty project. It is time to add a source file to this project. In the Solution Explorer, right click on the OakTutorial project, then select Add → New Item.

Fill the dialog that appears as indicated in the screenshot below.

- Categories: Code
- Templates: C++ File (.cpp)
- Name: main.cpp
- Location: C:\Code\OakTutorial
Once done, click the Add button.
To test that the setup is correct, paste the following code into main.cpp
#include <cstdio>

using namespace std;

int main()
{
      printf("OakTutorial\n");
      return 0;
}
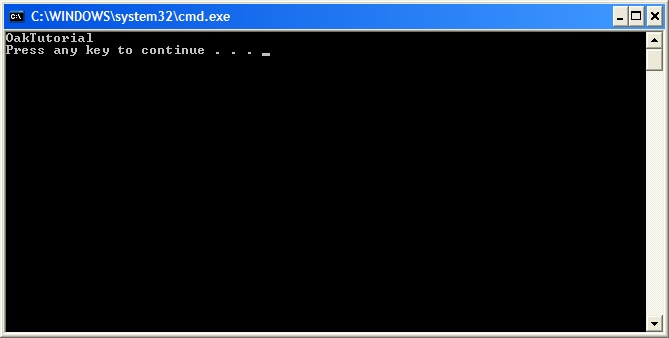
Compile the code ( Build → Build Solution ) and execute it ( Debug → Start without Debugging ) . If everything is OK, you should see the following:
Setting up the Oak library
Extract the Oak library archive to your computer. From the decompressed archive,
- copy oak.h to C:\Code\OakTutorial . oak.h contains all the function declaration that are part of the OakLib library
- enter the ASCII folder and copy oaka.dll and oaka.lib to C:\Code\OakTutorial. The oaka.dll file contains the actual code of the library functions that our application will use. The one we have copied is the ASCII version (as opposed to Unicode version that is also part of the archive). The oaka.lib file is a library file that will allow Visual C++ to link our code with the functions of the OakLib library.
Before we can use the library, we still need to do two things:
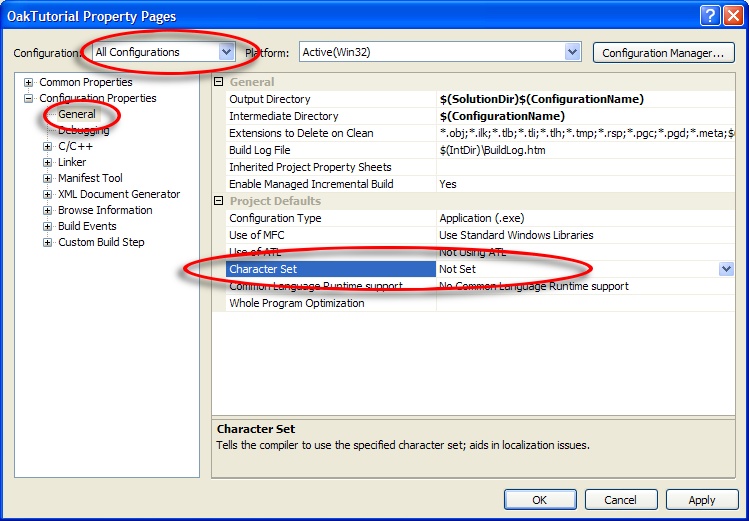
- Tell the compiler that we want to compile our code without Unicode support. To do that, right-click on the OakTutorial project in the Solution Explorer window, then select Properties. In the dialog that appears, first set the Configuration to All Configurations, then browse to the Configuration Properties → General page, and the value of the property Character Set to Not Set, as illustrated in the figure below. Do not close the dialog yet.
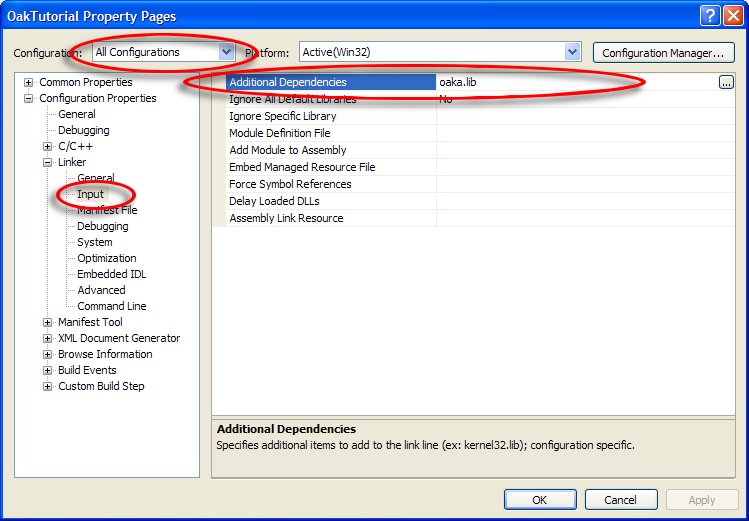
- Tell the linker to link our program with the OakLib library. In the project properties dialog, with Configuration set to All Configurations, go to the Configuration Properties → Linker → Input page, and set the Additional Dependencies property to oaka.lib. Click the OK button to close the dialog. Our project is now properly configured to use the Oak library.
Opening the device
The first function that we need to use is the one that 'finds' a sensor according to a series of criteria. The function declaration is
bool Oak_FindSensor(WORD PID,
                       WORD REV,
                       LPTSTR SN,
                       LPTSTR DeviceName,
                       LPTSTR ChannelName,
                       LPTSTR UserDeviceName,
                       LPTSTR UserChannelName,
                       PtOakSensor SensorFound);
The 7 first parameters are the search criteria: USB PID (each sensor type has a fixed USB product ID), revision ID, serial number, Device Name, User Device Name, Channel Name, user channel name (we will discuss channel and device names later in this tutorial). If you do not want to use a search criterion, just set its value to 0. The last parameter, SensorFound, is a pointer to a structure tOakSensor that is defined in the oak.h header file. If a sensor matching the search criteria is found, the function will return true, and SensorFound will be filled with information about the sensor. If no matching sensor was found, the function will return false, and the content of SensorFound will be undetermined.
In our case, we want to find an Oak Pressure sensor, whose PID is 0x2. If you are following this tutorial with a different sensor, use the PID of your sensor. Let's modify main.cpp and finally start writing something useful:
#include "Oak.h"
#include <stdexcept>
#include <cstdio>
#include <cassert>

using namespace std;

//**********************************************************************************************************************
/// \brief Program entry point
//**********************************************************************************************************************
int main()
{
      try
      {
         // Try to open a Oak P sensor (USB PID 0x2)
         tOakSensor sensor;
         if (!Oak_FindSensor(0x02, 00, 00, 00, 00, 00, 00, &sensor))
            throw std::runtime_error("No Oak P sensor found");

         // Display some informations about the sensor
         printf("Found a Oak P sensor\nUser Device Name: %s\nSerial Number: %s\n", sensor.UserDeviceName, sensor.SN) ;
      }
      catch (std::runtime_error const& e)
      {
         fprintf(stderr, "%s\n", e.what());
         return 1;
      }
      return 0;
}
This simple program use Oak_FindSensor() to locate a Oak P sensor, and if it finds one, it display some of the information available in the sensor structure.
Settings device parameters
Each Oak sensor has a set of parameters that can be read / written in Flash (persistent memory) or RAM (volatile memory). Some of these parameters are specific to a type of Oak sensors, while others are available on all types of Oak devices, like the LED mode, sample and report rates, etc...
To set / get the values of parameters, we will use USB Feature reports, and the Oak_Feature() function of the OakLib library. The Oak sensors datasheets contains a list of Feature Reports available for each sensor. As an example, let's write a function that cycles the LED mode (the way the red LED included on the device blinks). This implies two operations. We will first read the current LED mode, then change its value. Here is a copy of the description of the "LED Mode" Feature report in the Oak P datasheet:
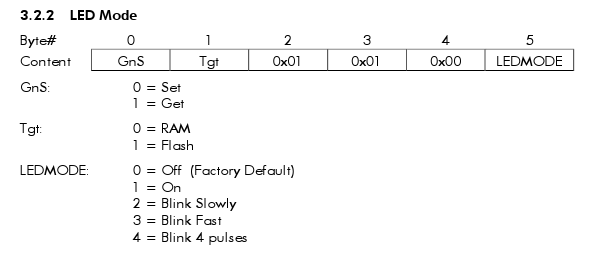
The first byte (byte 0 - GNS) of the feature report indicates whether we want to set or get the value of the LED Mode. The second byte (Tgt, for target) indicates whether you want to set / get the parameter in the RAM or in FLASH memory. If you set the parameters in RAM, it will only be used until your device is powered down (by unplugging it or shutting down your computer). When you plug you device again, the LED mode will be reverted to the value that is stored in Flash memory. So if you want the setting to persist, set the target value to Flash. The 6th byte allows you to specify the LED Mode you want, and of course, it is not used when you set the value of GNS to Get.
The OakLib function for sending feature reports is
bool Oak_Feature(LPCTSTR DevicePath, BYTE RptBuf[33], bool ExpectResult);
- The DevicePath parameter is the path of the device, which can be found under the name DevicePath in the sensor structure returned by Oak_FindSensor().
- The RptBuffer[33] in an array containing the content of the report that we want to send
- ExpectResult should be set the true if the function should be waiting for a reply from the device (which mean it should be set to true for if the operation is 'Get' and false if the operation is "Set".
One important note regarding the RptBuffer: the first byte of the report must be set to zero, which is the report number. The actual feature report should start at RptBuffer[1].
If you are expecting a reply, the content of the reply will be in the RptBuffer parameter upon function exit (provided the function completed successfully and returned 'true'). The actual data is starts at RptBuffer[2], as RptBuffer[0] is the report number and RptBuffer[1] is an operation code that is set of 0xff if the operation was successful. If you are expecting a multi-byte reply, the format is little-endian, meaning the least significant byte have the lowest index in the buffer.
With all this information, we can now write two functions for reading and writing the LED mode
//**********************************************************************************************************************
/// \brief Set the LED mode for the given sensor
///
/// \param[in] devicePath The path to the device
/// \param[in] ledMode The new value for the LED mode. Refer to the device data sheet for the list of LED modes
/// \param[in] persistent If set to true, the LED mode will be stored in FLASH, otherwise it will be stored in RAM
/// \return true if and only if the operation completed successfully
//**********************************************************************************************************************
bool setLedMode(char* devicePath, unsigned char ledMode, bool persistent)
{
      assert(ledMode < 5);
      unsigned char buffer[33] = { 0x00 /* report number */, 0x00 /* Set */, persistent ? 0x01 : 0x00, 0x01, 0x01, 0x00,
                                  ledMode};
      return Oak_Feature(devicePath, buffer, false);
}

//**********************************************************************************************************************
/// \brief Set the LED mode for the given sensor
///
/// \param[in] devicePath The path to the device
/// \param[out] outLedMode Upon function exit, if the function returns true this variable hold the retrieved value of the
/// LED mode
/// \param[in] persistent If set to true, the LED mode will be retrieved FLASH, otherwise it will be retrieved from RAM
/// \return true if and only if the operation completed successfully
//**********************************************************************************************************************
bool getLedMode(char* devicePath, unsigned char& outLedMode, bool persistent)
{
      unsigned char buffer[33] = { 0x00 /* report number */, 0x01 /* Get */, persistent ? 0x01 : 0x00, 0x01, 0x01, 0x00 };
      if (!Oak_Feature(devicePath, buffer, true))
         return false;
      outLedMode = buffer[2];
      return true;
}
Let's also modify our main function so that at every launch of the application, the LED mode is changed to the next one available:
//**********************************************************************************************************************
/// \brief Program entry point
//**********************************************************************************************************************
int main()
{
      try
      {
         // Try to open a Oak P sensor (USB PID 0x2)
         tOakSensor sensor;
         if (!Oak_FindSensor(0x02, 00, 00, 00, 00, 00, 00, &sensor))
            throw std::runtime_error("No Oak P sensor found");

         // Display some informations about the sensor
         printf("Found a Oak P sensor\nUser Device Name: %s\nSerial Number: %s\n", sensor.UserDeviceName, sensor.SN) ;

         unsigned char ledMode;
         if (!getLedMode(sensor.DevicePath, ledMode, true))
            throw std::runtime_error("Error getting LED mode");

         // Play a bit with the LED mode
         printf("Current LED mode: %u\n", ledMode);
         ledMode = (ledMode + 1) % 5; // advance to the next LED mode (acceptable values are in the range [0..4])
         printf("New LED mode: %u\n", ledMode);
         // we set the LED mode to the next one
         if (!setLedMode(sensor.DevicePath, (ledMode + 1) % 5, true))
            throw std::runtime_error("Error setting LED mode");
      }
      catch (std::runtime_error const& e)
      {
         fprintf(stderr, "%s\n", e.what());
         return 1;
      }
      return 0;
}
Changing sample mode, sample rate and report rate
The Oak USB architecture allows for report rate (the rate at which the device sends a report containing its current status, known in USB lingo as an "Interrupt In" in report. ranging from 1ms to 65535 ms. The lower limit of 1ms is imposed by the USB protocol. The sensor itself has a sampling rate, which can be different from the reporting rate. The limits of the sampling rate depend on the type of sensor and can be found in each device's datasheet.
These rates can be adjusted using three feature reports:
- Sample Rate: the sample rate determines the rate at which the sensor performs data sampling, in milliseconds.
- Report Rate: the report rate determines the rate at which the device sends sampled data to the computer, in milliseconds.
- Report Mode: there are 3 modes:
- After sampling (the default mode): a report is sent every time the sensor performs sampling. In this mode, the report rate is ignored.
- After change: a report is sent after sampling only if the sampled values are different for the last sent values. In this mode, the report rate is ignored.
- Fixed rate: the sensor performs sampling using the specified sample rate and sends report at the specified report rate.
If you are unsure, use 'After Sampling'.
Each of these feature report are documented in the sensor's datasheet, and all sensors types use the same report, so it is easy to write functions for setting/getting the sample rate, the report rate and the report mode.
//**********************************************************************************************************************
/// \brief Get the report rate of the given sensor
///
/// \param[in] devicePath The path to the device
/// \param[out] outReportRate Upon function exit, if the function returns true this variable hold the retrieved value
/// of the report rate
/// \param[in] persistent If set to true, the report rate will be retrieved FLASH, otherwise it will be retrieved from
/// RAM
/// \return true if and only if the operation completed successfully
//**********************************************************************************************************************
bool getReportRate(char* devicePath, unsigned short& outReportRate, bool persistent)
{
      unsigned char buffer[33] = { 0x00 /* report number */, 0x01 /* Get */, persistent ? 0x01 : 0x00, 0x02, 0x00, 0x00 };
      if (!Oak_Feature(devicePath, buffer, true))
         return false;
      outReportRate = (unsigned short)(buffer[2]) | ((unsigned short)(buffer[3]) << 8);
      return true;
}

//**********************************************************************************************************************
/// \brief Set the report rate for  the given sensor
///
/// \param[in] devicePath The path to the device
/// \param[in] reportRate The new value for the report mode, in milliseconds
/// \param[in] persistent If set to true, the report rate will be stored in FLASH, otherwise it will be stored in RAM
/// \return true if and only if the operation completed successfully
//**********************************************************************************************************************
bool setReportRate(char* devicePath, unsigned short reportRate, bool persistent)
{
      unsigned char buffer[33] = { 0x00 /* report number */, 0x00 /* Set */, persistent ? 0x01 : 0x00, 0x02, 0x00, 0x00,
         (unsigned char)(reportRate), (unsigned char)(reportRate >> 8)};
      return Oak_Feature(devicePath, buffer, false);
}

//**********************************************************************************************************************
/// \brief Get the sample rate of the given sensor
///
/// \param[in] devicePath The path to the device
/// \param[out] outSampleRate Upon function exit, if the function returns true this variable hold the retrieved value
/// of the sample rate
/// \param[in] persistent If set to true, the sample rate will be retrieved FLASH, otherwise it will be retrieved from
/// RAM
/// \return true if and only if the operation completed successfully
//**********************************************************************************************************************
bool getSampleRate(char* devicePath, unsigned short& outSampleRate, bool persistent)
{
      unsigned char buffer[33] = { 0x00 /* report number */, 0x01 /* Get */, persistent ? 0x01 : 0x00, 0x02, 0x01, 0x00 };
      if (!Oak_Feature(devicePath, buffer, true))
         return false;
      outSampleRate = (unsigned short)(buffer[2]) | ((unsigned short)(buffer[3]) << 8);
      return true;
}

//**********************************************************************************************************************
/// \brief Set the sample rate for  the given sensor
///
/// \param[in] devicePath The path to the device
/// \param[in] sampleRate The new value for the report mode, in milliseconds
/// \param[in] persistent If set to true, the sample rate will be stored in FLASH, otherwise it will be stored in RAM
/// \return true if and only if the operation completed successfully
//**********************************************************************************************************************
bool setSampleRate(char* devicePath, unsigned short sampleRate, bool persistent)
{
      unsigned char buffer[33] = { 0x00 /* report number */, 0x00 /* Set */, persistent ? 0x01 : 0x00, 0x02, 0x01, 0x00,
         (unsigned char)(sampleRate), (unsigned char)(sampleRate >> 8)};
      return Oak_Feature(devicePath, buffer, false);
}

//**********************************************************************************************************************
/// \brief Get the report mode of the given sensor
///
/// \param[in] devicePath The path to the device
/// \param[out] outReportMode Upon function exit, if the function returns true this variable hold the retrieved value
/// of the report mode
/// \param[in] persistent If set to true, the report mode will be retrieved FLASH, otherwise it will be retrieved from
/// RAM
/// \return true if and only if the operation completed successfully
//**********************************************************************************************************************
bool getReportMode(char* devicePath, unsigned char& outReportMode, bool persistent)
{
      unsigned char buffer[33] = { 0x00 /* report number */, 0x01 /* Get */, persistent ? 0x01 : 0x00, 0x01, 0x00, 0x00 };
      if (!Oak_Feature(devicePath, buffer, true))
         return false;
      outReportMode = buffer[2];
      return true;
}

//**********************************************************************************************************************
/// \brief Set the report mode for  the given sensor
///
/// \param[in] devicePath The path to the device
/// \param[in] reportMode The new value for the report mode, in milliseconds
/// \param[in] persistent If set to true, the report mode will be stored in FLASH, otherwise it will be stored in RAM
/// \return true if and only if the operation completed successfully
//**********************************************************************************************************************
bool setReportMode(char* devicePath, unsigned char reportMode, bool persistent)
{
      assert(reportMode <= 2);
      unsigned char buffer[33] = { 0x00 /* report number */, 0x00 /* Set */, persistent ? 0x01 : 0x00, 0x01, 0x00, 0x00,
         reportMode };
      return Oak_Feature(devicePath, buffer, false);
}
Let's now add some code to our main function to set the report mode to 'After Sampling' and the sample rate to 100ms:
//**********************************************************************************************************************
/// \brief Program entry point
//**********************************************************************************************************************
int main()
{
      try
      {
         // Try to open a Oak P sensor (USB PID 0x2)
         tOakSensor sensor;
         if (!Oak_FindSensor(0x02, 00, 00, 00, 00, 00, 00, &sensor))
            throw std::runtime_error("No Oak P sensor found");

         // Display some informations about the sensor
         printf("Found a Oak P sensor\nUser Device Name: %s\nSerial Number: %s\n", sensor.UserDeviceName, sensor.SN) ;

         unsigned char ledMode;
         if (!getLedMode(sensor.DevicePath, ledMode, true))
            throw std::runtime_error("Error getting LED mode");

         // Play a bit with the LED mode
         printf("Current LED mode: %u\n", ledMode);
         ledMode = (ledMode + 1) % 5; // advance to the next LED mode (acceptable values are in the range [0..4])
         printf("New LED mode: %u\n", ledMode);
         // we set the LED mode to the next one
         if (!setLedMode(sensor.DevicePath, (ledMode + 1) % 5, true))
            throw std::runtime_error("Error setting LED mode");

         // Set the report mode to 'After Sampling'
         if (!setReportMode(sensor.DevicePath, 0, true))
            throw std::runtime_error("Error setting the report mode");

         // Set the sample rate to 100ms
         if (!setSampleRate(sensor.DevicePath, 100, true))
            throw std::runtime_error("Error setting sample rate");

      }
      catch (std::runtime_error const& e)
      {
         fprintf(stderr, "%s\n", e.what());
         return 1;
      }
      return 0;
}
There are many other feature reports available, some are common to all Oak sensors, and some are specific to a certain type of sensors. Using the example we have just studied and your device datasheet, you should have no problems using these feature reports.
Reading the device state
It's now time to read the actual sensor state! Sensor state is send at the rate specified by the setting with have just modified (every 100ms), using a report called Interrupt In report. There are two options for reading the interrupt report: Oak_GetInReport() or Oak_GetCurrentInReport().
Oak_GetInReport()
This is the classic method. The function's prototype is:
bool Oak_GetInReport(LPCTSTR DevicePath, BYTE RptBuf[33], BYTE InReportLength, WORD Timeout_ms);
This function is blocking and will not return until the next Interrupt In report is received (or until the specified timeout has elpased).
- Again, DevicePath is the path to the device;
- RptBuffer is a buffer that will contain the Interrupt In report if the function call is successful;
- InReportLength is the length of the report. Use 33.
- Timeout_ms is the number of milliseconds after which the function will return false if no Interrupt In report has arrived.
As you see the execution time of this function is dependent on the sample and report rate selected, and may not be appropriate for GUI application unless you have several threads running.
Oak_GetCurrentInReport()
This variant is only available on Windows XP and more recent flavors of Windows. The function's prototype is:
bool Oak_GetCurrentInReport(LPCTSTR DevicePath, BYTE RptBuf[33], BYTE InReportLength);
The 3 parameters have the exact same meaning as for the Oak_GetInReport(), and the only difference is that this function is non blocking (hence the absence of the timeout parameter): it returns immediately the last report that was received.
Picking one variant or the other really depends on the needs of your application.
Processing the Interrupt In report
The content of the Interrupt In report depends on the sensor type. Each sensor datasheet list the content of the Interrupt In buffer. For instance, for the Oak P sensor the description is the following:

With this we can easily write a function that read the Oak P Interrupt In report. Note that as usual, the report data starts at index 1, as the byte at index 0 is the report number.
//**********************************************************************************************************************
/// \brief Read the state of the Oak distance sensor. This function waits until the next Interrupt In report arrive
/// (delay depends on the sample rate, report mode and report rate), then parse the report, according the the
/// format specified for the report in the device's datasheet, chapter 3.1.
///
/// \param[in] devicePath The path to the device
/// \param[out] outFrameNumber Upon function exit, if the function returns true this variable hold the frame number at
/// which the sampling was performed (the frame number is time stamp in milliseconds, internally coded on 11-bits, so
/// it wraps around every 2048 milliseconds.
/// \param[out] outPressure Upon function exit, if the function returns true this variable hold the pressure read by the
/// sensor
/// \param[out] outTemperature Upon function exit, if the function returns true this variable hold the temperature read
/// by the sensor
/// \return true if and only if the operation completed successfully
//**********************************************************************************************************************
bool readPSensorState(char* devicePath, unsigned short& outFrameNumber, unsigned short& outPressure,
                            unsigned short& outTemperature)
{
      unsigned char buffer[33];
      if (!Oak_GetInReport(devicePath, buffer, 33, 65535))
         return false;
      // buffer[0] is the report number (0), actual data starts at buffer[1]
      outFrameNumber = (unsigned short)buffer[1] | (((unsigned short)(buffer[2])) << 8);
      outPressure    = (unsigned short)buffer[3] | (((unsigned short)(buffer[4])) << 8);
      outTemperature = (unsigned short)buffer[5] | (((unsigned short)(buffer[6])) << 8);
      return true;
}
Finally, we add some printout of the read value in our main() function:
//**********************************************************************************************************************
/// \brief Program entry point
//**********************************************************************************************************************
int main()
{
      try
      {
         // Try to open a Oak P sensor (USB PID 0x2)
         tOakSensor sensor;
         if (!Oak_FindSensor(0x02, 00, 00, 00, 00, 00, 00, &sensor))
            throw std::runtime_error("No Oak P sensor found");

         // Display some informations about the sensor
         printf("Found a Oak P sensor\nUser Device Name: %s\nSerial Number: %s\n", sensor.UserDeviceName, sensor.SN) ;

         unsigned char ledMode;
         if (!getLedMode(sensor.DevicePath, ledMode, true))
            throw std::runtime_error("Error getting LED mode");

         // Play a bit with the LED mode
         printf("Current LED mode: %u\n", ledMode);
         ledMode = (ledMode + 1) % 5; // advance to the next LED mode (acceptable values are in the range [0..4])
         printf("New LED mode: %u\n", ledMode);
         // we set the LED mode to the next one
         if (!setLedMode(sensor.DevicePath, (ledMode + 1) % 5, true))
            throw std::runtime_error("Error setting LED mode");

         // Set the report mode to 'After Sampling'
         if (!setReportMode(sensor.DevicePath, 0, true))
            throw std::runtime_error("Error setting the report mode");

         // Set the sample rate to 100ms
         if (!setSampleRate(sensor.DevicePath, 100, true))
            throw std::runtime_error("Error setting sample rate");


         // now enter a loop where we read the device's state using the Interrupt reports arrive at the rate specified above
         while (GetAsyncKeyState(VK_ESCAPE) >= 0) // press the Escape key to end the program
         {
            unsigned short frameNumber(0), pressure(0), temperature(0);
            if (!readPSensorState(sensor.DevicePath, frameNumber, pressure, temperature))
               throw std::runtime_error("Error reading sensor state");
            // print the values, carefully taking care of the units specified in the datasheet.
            printf("Frame number : %5.3fs - Pressure: %6uPa - Temperature: %5.1fK\r", float(frameNumber) * 0.001f, pressure * 10, float(temperature)/ 10.0f );
         }
      }
      catch (std::runtime_error const& e)
      {
         fprintf(stderr, "%s\n", e.what());
         return 1;
      }
      return 0;
}
Conclusion
This conclude this tutorial. You can download the complete solution folder for Visual Studio 2008.