This article provides step-by-step instructions on how to cross-compile a simple Hello World application on the development host using the Linaro toolchain, either through a command-line shell or Eclipse. It also gives instructions on how to run the application on the target device.
In addition to a simple Hello World application, we are using the gtk-scribble example for the Eclipse introduction.
Linux (Colibri T20) - Sample Code
Follow this article for information on setting up your environment for Embedded Linux application development.
An alternative to the Eclipse configuration presented in this article (which uses the Linaro toolchain), you can check the Quickstart Guide and the Linux SDKs article (which use OpenEmbedded generated SDKs).
At the development host terminal:
cd
mkdir hello_world
cd hello_world
At the development host terminal:
Note: the '&' at the end of a command line forks the started process and runs it in the background. You immediately get back the prompt in the terminal window to enter further commands and the background process will not be terminated when the terminal gets terminated.
gedit hello_world.c &
Type the following code in the editor:
#include <stdio.h>                  // standard I/O header file

int main(int argc, char **argv)
{
     printf("\nHello World !!!\n");        // print "Hello World" message on screen
     return(0);
}
Use Ctrl+S to save the editor content.
export CROSS_COMPILE=~/oe-core/build/out-glibc/sysroots/x86_64-linux/usr/bin/arm-angstrom-linux-gnueabi/arm-angstrom-linux-gnueabi-
${CROSS_COMPILE}gcc --sysroot=${HOME}/oe-core/build/out-glibc/sysroots/apalis-t30 -mfloat-abi=hard -o hello_world hello_world.c
Note the "-mfloat-abi=hard" needed for the Openembedded toolchain which starting with V2.4 of our images defaults to "-mfloat-abi=soft" and the "--sysroot=..." needed for the gcc 5.2 cross compiler which is used starting with V2.6 of our BSPs.
1. Copy the file to the target system using a USB memory stick.
At the development host terminal:
Example:
cp –f hello_world /media/USBDrive
Connect the USB memory stick to the target device.
Copy the "hello_world" to the target device.
At the target device terminal:
cd /home/root
cp –f /media/sda1/hello_world /home/root/
2. Copy the file using SSH via the network between the development host and the target device.
At the target device terminal:
ifconfig
Expected output:
Example:

...
eth0      Link encap:Ethernet  HWaddr 00:50:B6:06:C4:57
          inet addr:192.168.10.2  Bcast:192.168.10.255  Mask:255.255.255.0
          inet6 addr: fe80::250:b6ff:fe06:c457/64 Scope:Link
          UP BROADCAST RUNNING MULTICAST  MTU:1500  Metric:1
          RX packets:15354 errors:0 dropped:0 overruns:0 frame:0
          TX packets:17551 errors:0 dropped:0 overruns:0 carrier:0
          collisions:0 txqueuelen:1000
          RX bytes:1701782 (1.6 MiB)  TX bytes:13514892 (12.8 MiB)
...
The following assumes the IP address of the target to be: 192.168.10.2
Note that in our images a SSH server is already installed and active by default.
At the development host terminal:
scp /localfile/path root@192.168.10.2:/remote/path
Example:
cd
scp hello_world/hello_world root@192.168.10.2:/home/root/
Enter the root password for the target device (none set by default) and press Enter.
At the target device terminal:
./hello_world
Expected Output:
Hello World !!!
Note 1:
The hello_world binary must have the executable (x) bit set. If it has not you will get,
-sh: ./hello_world: Permission denied
Check it with ls -l, set it with chmod if needed.
ls -l hello_world
-rwxr-xr-x    1 root     root          5352 Jul 15  2013 hello_world
chmod ugo+x hello_world
Note 2:
If hello_world was compiled for the soft-float ABI, e.g. because you used a toolchain which by default does generate executable binaries for the soft-float ABI then you get the following error message even though the file does exist:
-sh: ./hello_world: No such file or directory
cd
wget http://developer.toradex.com/files/toradex-dev/uploads/media/Colibri/Linux/Samples/gtk_scribble_V2.zip
eclipse &
In Eclipse a view is a child window showing data in a specific form, e.g. the Editor view displays a file, the Project Explorer view shows the directory/file structure of your projects.
A Perspective is a collection of such views which are shown at the same time and enable you to do certain tasks, e.g. the C/C++ Perspective enables C code development.
Switch to the C/C++ Perspective by using the menu Window->Open Perspective.
Use menu File->Import, General/Existing Projects into Workspace, select Archive File and Browse for gtk_scribble_V2.zip. Click Finish.
In the Project Explorer view double click the README file and read it.
In this example we use the external toolchain flavour, so in a terminal window we create a symbolic link to the ExtToolchain Makefile and prepare the target rootfs shared objects to be ready for development:
cd
cd workspace/gtk_scribble_V2
ln -s Makefile.ExtToolchain_Rootfs Makefile
cd /srv/nfs/rootfs/usr/lib
sudo sh -c "ls -w 1 | grep '\.so\.[0-9]*\.[0-9]*\.[0-9]*$' | sed -r 's/(.*\.so)(\.[0-9]*\.[0-9]*\.[0-9]*$)/ln -s \1\2 \1/' > makesymlinks.sh"
sudo chmod +x makesymlinks.sh
sudo ./makesymlinks.sh
sudo rm makesymlinks.sh
The Make Target view provides a convenient way to call make with various targets.
Right click 'all' and choose edit to inspect what parameters are passed to make for a given entry. Leave the dialogue with Cancel when done.
Double click the x86 all target to compile the code to run on your x86 host. Note that some intermediate files plus the executable 'scribble.x86' appear in the Project Explorer.
Double click the all target to cross compile for your target. Note that the executable 'scribble' appears in the Project Explorer.
Lets examine the build output and run the x86 executable in a terminal window:
[trdx@trdx gtk_scribble_V2]$ file scribble.x86 scribble
scribble.x86: ELF 32-bit LSB executable, Intel 80386, version 1 (SYSV), dynamically linked (uses shared libs), for GNU/Linux 2.6.32, not stripped
scribble:     ELF 32-bit LSB executable, ARM, version 1 (SYSV), dynamically linked (uses shared libs), for GNU/Linux 2.6.16, not stripped
[trdx@trdx gtk_scribble_V2]$ ./scribble.x86
Copy and execute the scribble file on the target in the same way as we did with the hello_world file.
Using the mouse, select:
Menu options --> File --> New --> Project
Using the mouse, select C project and Next.
Project name: hello_world
Using the mouse, select:
Project Type: Makefile project -->Empty Project
Toolchains: Cross GCC
Once we have an empty project hello_world created the next step is to add files to the project.
Project Explorer --> "hello_world" --> Right click the mouse
Using the mouse, select:
New --> File
File name: hello_world.c
Type the C program in the "hello_world.c" file and Save.
Note: If we build the project without configuring the build settings, the program will get compiled and build for the development/native (x86) platform.
Using the mouse, select:
C/C++ Build --> Settings
Tab 'Tool Settings'
List entry 'Cross Settings'
Enter the cross toolchain prefix "arm-linux-gnueabihf-".
Enter the full directory path for "gcc-linaro/bin".
Example:
Prefix: arm-linux-gnueabihf-
Path: /home/toradex/gcc-linaro/bin
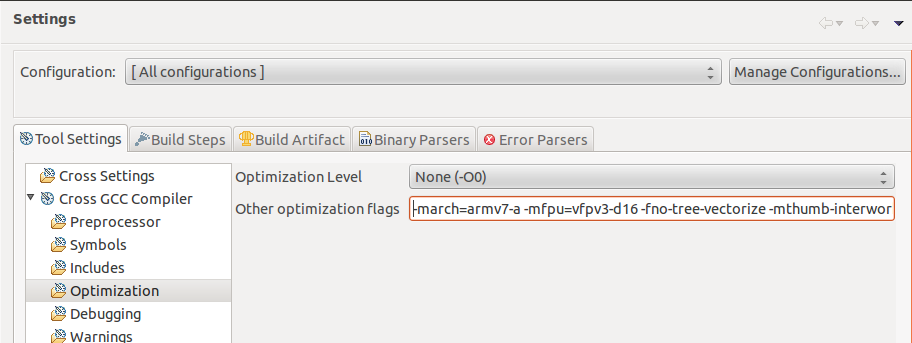
Enter the compiler options required for the used ARM architecture:
List entry 'Cross GCC Compiler -> Optimization'
Example:
Optimization flags: -march=armv7-a -fno-tree-vectorize -mthumb-interwork -mfloat-abi=hard -mtune=cortex-a9 -Wno-poison-system-directories
Note: Set 'march' & 'mtune' according to the target architecture.

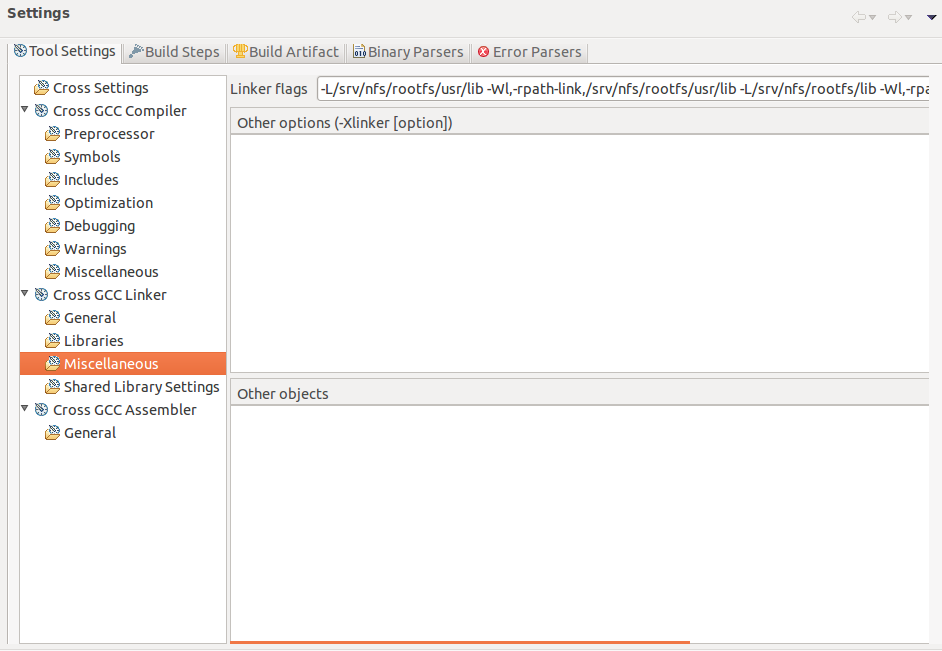
Enter the linker options required to find the target rootfs and its libraries:
List entry 'Cross GCC Linker -> Miscellaneous'
Example:
Linker flags: -L/srv/nfs/rootfs/usr/lib -Wl,-rpath-link,/srv/nfs/rootfs/usr/lib -L/srv/nfs/rootfs/lib -Wl,-rpath-link,/srv/nfs/rootfs/lib
Note: Be sure to enter the path to the target's rootfs as it resides on your host machine. The rootfs is provided in our evaluation Linux images or it may be built using OpenEmbedded.

click OK
Using the mouse, select:
Menu options --> Project --> Build All
Verify the build messages,
Console --> CTD Build Console [hello_world]
Now, the "hello_world" application is ready to be deployed to the target device. Check the Debug folder with the intermediate files and the executable file hello_world.
The Remote System Explorer plugin allows accessing other computers over Ethernet from within Eclipse. For the connection with our target device, we will be using SSH as the transport protocol. This feature is mainly used for debugging on the target from within Eclipse.
Using the mouse, select:
Menu options --> Windows --> Open Perspective --> Other...
Using the mouse, select:
Remote System Explorer
OK
Using the mouse, select icon:
Remote System --> Define a connection to remote system
Follow the steps as shown in the images below, make sure to use 'Next' and not 'Finish' to go on:
Host name: Enter the IP address of your target device.
Connection name: The default value is the same as the host name, but this can be changed to a more human readable value.
Description: Some suitable description for the connection.
Select, Verify host name
By default, Eclipse uses the User ID from the host to login to the target.
Change the default User ID used to connect to the SSH server on the target device to root:
Enter the password for the target device (none set by default) and press Enter.
To transfer the "hello_world" application from the development host to the target device with the help of the Remote System Explorer, copy the executable from the project directory on the development host and paste it under:
Eclipse --> Remote System --> Sftp files --> My home
To access the target device, use the SSH terminal in Eclipse.
Run the hello_world application from the SSH terminal:
cd
chmod +x hello_world
./hello_world
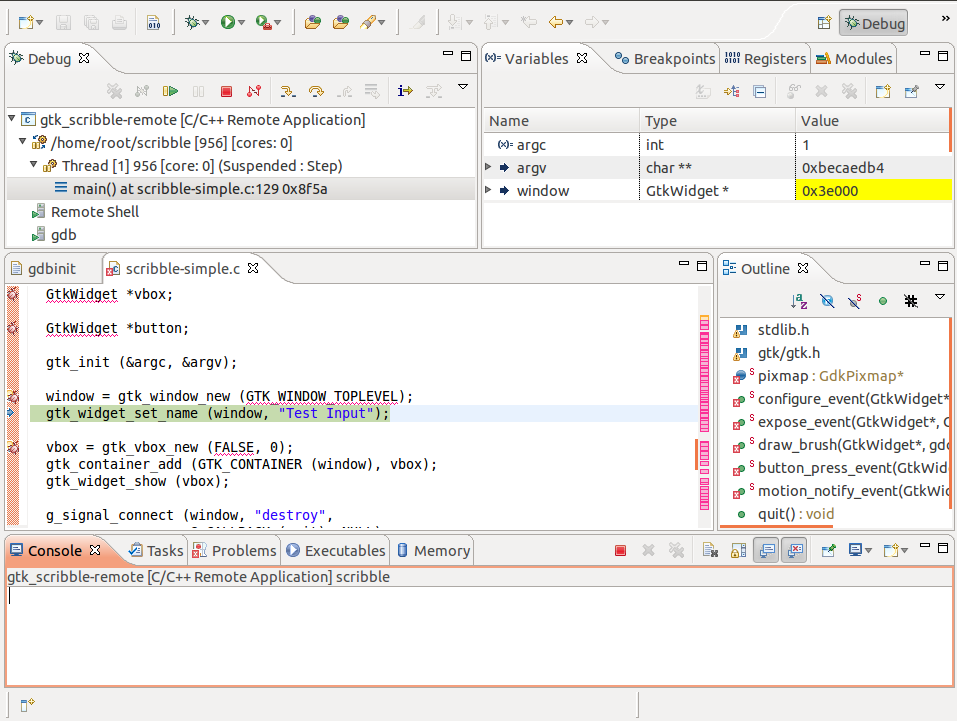
To debug an application on the target device which is controlled by the development host the following components are used:
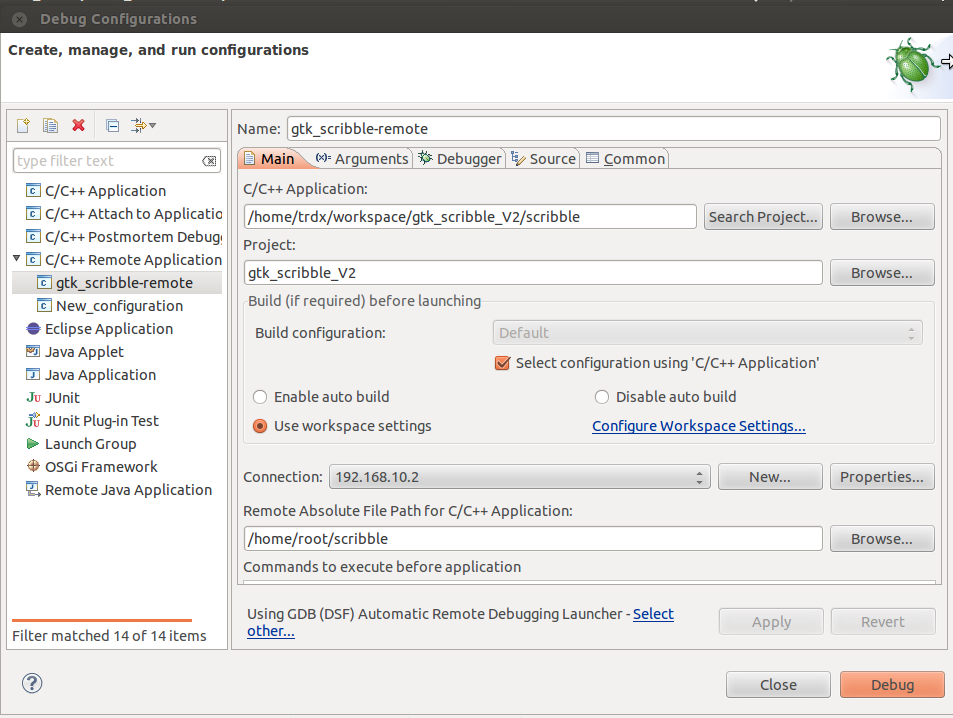
Menu options --> Run --> Debug Configurations...
Create a new 'C/C++ Remote Application' launch configuration
Give it a Name
In the Main tab
- set the C/C++ Application (Note: Depending on the Eclipse version the order of input fields might be different)
- set the Eclipse Project
- use the RSE Connection already defined, or create a new SSH connection if you are not using the Remote System Explorer
- set the C/C++ Application on the Target (Note: If you don't get the Remote Absolute File Path try first configuring a regular run configuration)
- click Apply

In the Debugger tab
- set the path to the cross debugger: /home/toradex/gcc-linaro/bin/arm-linux-gnueabihf-gdb
- set the GDB command file, e.g. to gdbinit
- click Apply

The debugger needs access to the shared library files used on the target device, so if a shared object file is opened by your application on the target device it can read that same file from a storage location on the development host. Create the GDB command file in the Eclipse project and set solib-absolute-prefix to point to the rootfs used on the target device:
set solib-absolute-prefix /srv/nfs/rootfs
