Boot from a TFTP/NFS Server
Introduction
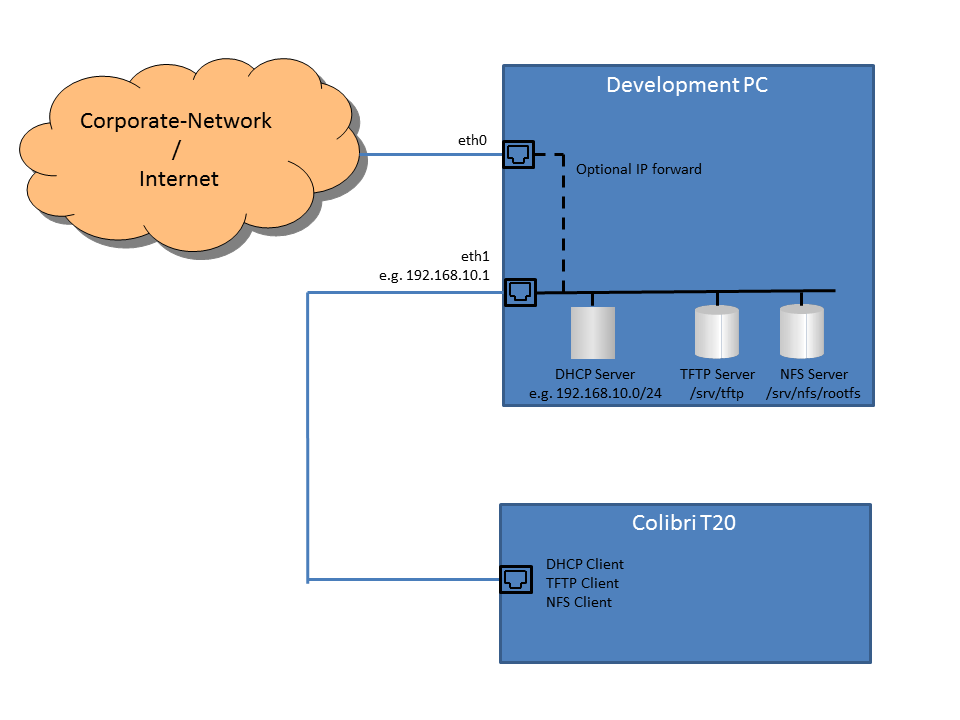
A common configuration for rapid kernel/application development and debugging is to have the target machine connected to a development host (usually a PC) inside a network. The target retrieves the kernel (and device trees/device tree overlays) from a TFTP server running on the host and uses a root filesystem from an NFS server, also served by the host. This setup makes testing very convenient, as the developer can easily deploy new kernel builds and root filesystem contents in the respective local (host) server folders instead of having to transfer them to the target every single time (usually through a removable media such as an SD card or a USB stick). This article describes how to configure this setup.
Requirements
In order to boot your module from a TFTP/NFS server you need:
- U-Boot running on your module. If this is not the case, please use the Toradex Easy Installer to install a running image first. Alternatively, if not (yet) available for your particular module revert to using the Legacy Update Procedure as outlined in the Reference Images for Yocto Project Software Downloads - Legacy Image Format
- Install and configure a DHCP, TFTP and NFS server on your development PC
Procedure
We recommend using a second interface card on your development PC to build a dedicated network to your module. Alternatively, you can set a VLAN to isolate your target from the rest of the network.
The boot sequence for the described scenario follows the steps below:
- U-Boot obtains the IP address and the name of the file containing the U-boot Distroboot script from the DHCP server running on the host.
- U-Boot executes the script, obtaining linux kernel image, device tree/device tree overlays, auxiliary binaries (like M4 elf files or GPU firmware).
- U-Boot sets the kernel's command line so that the kernel mounts the rootfs from an NFS server.
- Linux uses DHCP again to get an IP address and retrieve the root-path arguments.
- Linux tries to mount the root file system using the root-path.
First, you need to install and configure a DHCP, TFTP and NFS servers. Please consult your distribution's documentation on what server packages are needed and how they need to be configured. You might additionally need to allow these protocols to be passed through by your firewall rules.
The following sample configuration may (or may not) fit your distribution.
After configuration changes and when modifying the served NFS files, the servers need to be restarted: e.g. on Ubuntu: #service isc-dhcp-server restart; service tftpd-hpa restart; service nfs-kernel-server restart; on Fedora: # systemctl restart dhcpd.service; systemctl restart nfs-server.service
Sample DHCP Configuration
Some points to be taken into consideration:
- The server IP 192.168.10.1 (your computer) is the default
serveripvariable on U-boot. This way you don't need to configure the server IP if you are using default configurations. - The client IP 192.168.10.2 (your module) is the default
ipaddrvariable on U-boot. This way you don't need to configure the client IP if you are using default configurations. - The
interfaceproperty must be the name of the Interface where the module is connected via an Ethernet cable. On Ubuntu, you can get this information by using the commandip linkofifconfig. - The
hardware ethernetproperty must be the MAC Address of your module. Please refer to the MAC Address article to find out some ways to get this information from your module.
# dhcpd.conf
option domain-name "colibri.net";
option domain-name-servers ns1.example.org;

default-lease-time 600;
max-lease-time 7200;

# Use this to enable / disable dynamic dns updates globally.
ddns-update-style none;

# Use this to send dhcp log messages to a different log file (you also
# have to hack syslog.conf to complete the redirection).
log-facility local7;

subnet 192.168.10.0 netmask 255.255.255.0 {
        default-lease-time              86400;
        max-lease-time                  86400;
        option broadcast-address        192.168.10.255;
        option domain-name              "colibri.net";
        option domain-name-servers      ns1.example.org;
        option ip-forwarding            off;
        option routers                  192.168.10.1;
        option subnet-mask              255.255.255.0;
        interface                       eth1;
        range                           192.168.10.32 192.168.10.254;
}
#MAC address dependent IP assignment, used for the colibri target device
host eval {
        filename                        "uImage";
        fixed-address                   192.168.10.2;
        hardware ethernet               00:14:2d:48:8a:58;
        next-server                     192.168.10.1;
        option host-name                "colibri";
        option root-path                "192.168.10.1:/srv/nfs/rootfs,wsize=1024,rsize=1024,v3";
}
Sample root-path for NFSv4
option root-path "rootfs,v4,tcp,clientaddr=0.0.0.0";
For NFSv4, rootfs, as given above, is relative to the root path which is where the exports file has the option "fsid=root" set (see below).
Take care to only answer DHCP requests originating from your development network card. You won't make friends by providing addresses to clients on your corporate network!
Then, start/restart the relevant services e.g. on Ubuntu:
mk@ubuntu: ~ $ sudo service isc-dhcp-server restart
Or on Fedora:
[root@vm_one ~]# systemctl restart dhcpd.service
Sample TFTP Configuration
Configure the server to serve /srv/tftp.
E.g. on a recent Ubuntu: /etc/default/tftpd-hpa
E.g. on a recent Fedora: /etc/xinitd.d/tftp
Copy the contents of you bootfs folder, which contains kernel, device tree and auxiliary binaries to the tftp directory:
sudo cp -Ppr /path to bootfs/* /srv/tftp/
For example, for Apalis iMX8X TFTP folder should contain this list of files (or similar):
:/srv/tftp/$ ls -lah
drwxr-xr-x  3 user user 4.0K Oct 28 18:39 .
drwxrwxr-x 10 user user 4.0K Aug 28 16:39 ..
-rw-r--r--  1 user user 3.9K Oct 28 18:18 boot.scr
-rw-r--r--  1 user user 101K Oct 27 22:48 dpfw.bin
-rw-r--r--  1 user user 101K Oct 27 22:48 hdmitxfw.bin
-rw-r--r--  1 user user 9.4M Oct 27 22:48 Image.gz
-rw-r--r--  1 user user 159K Oct 27 22:48 imx8qm-apalis-eval.dtb
-rw-r--r--  1 user user 160K Oct 27 22:48 imx8qm-apalis-ixora-v1.1.dtb
-rw-r--r--  1 user user 159K Oct 27 22:48 imx8qm-apalis-v1.1-eval.dtb
-rw-r--r--  1 user user 160K Oct 27 22:48 imx8qm-apalis-v1.1-ixora-v1.1.dtb
drwxr-xr-x  2 user user 4.0K Oct 27 22:48 overlays
-rw-r--r--  1 user user   14 Oct 27 22:48 overlays.txt
Sample NFS Configuration
Copy the rootfs to /srv/nfs/rootfs (while preserving symlinks, timestamps..)
sudo cp -Ppr /path to image/rootfs/* /srv/nfs/rootfs
NFSv3 Configuration
Create an export configuration:
#/etc/exports
/srv/nfs/rootfs 192.168.10.2(no_root_squash,no_subtree_check,rw)
NFSv4 Configuration
Create an export configuration:
#/etc/exports
/srv/nfs 192.168.10.1/24(no_root_squash,no_subtree_check,rw,fsid=root)
The path for NFSv4 (/srv/nfs) is indeed different from the path for NFSv3 (/srv/nfs/rootfs).
Apply Configuration
Start/restart the relevant daemons e.g. on Ubuntu:
mk@ubuntu: ~ $ sudo service nfs-kernel-server restart
Or on Fedora:
[root@vm_one ~]# systemctl restart nfs-server.service
Run TFTP/NFS Boot from U-Boot
Starting from BSP 5.1.0 U-Boot leverages Distroboot capabilities for network boot. This requires only one command to be run in U-Boot shell (even regardless the module you're using):
Apalis iMX8X # run bootcmd_dhcp
NFS and connman
In our images we use connman to manage network connections.
When using an NFS mounted rootfs connman is not started during boot. This is because connman takes an already configured NIC down before bringing it up again. In the case of a NFS boot this unmounts the rootfs and makes the boot fail.
Should you require connman when using NFS, e.g. to do tests with wireless connectivity, you could change the connman.service file. Make sure to change eth0 to the name of the used NIC on Apalis T30. This is likely enp7s0.
--- lib/systemd/system/connman.service~ 2014-05-02 17:01:49.000000000 +0200
+++ lib/systemd/system/connman.service  2014-06-16 09:48:08.454798634 +0200
@@ -3,14 +3,15 @@
 After=syslog.target
 Before=remote-fs.target
 # only if not NFS mount, connman will disconnect your rootfs otherwise!
-ConditionKernelCommandLine=!root=/dev/nfs
+#ConditionKernelCommandLine=!root=/dev/nfs

 [Service]
 Type=dbus
 BusName=net.connman
 Restart=on-failure
 ExecStartPre=-/usr/lib/connman/wired-setup
-ExecStart=/usr/sbin/connmand -n
+#ExecStart=/usr/sbin/connmand -n
+ExecStart=/usr/sbin/connmand -n -I eth0
 StandardOutput=null

 [Install]