Verdin iMX8M Plus is the newest member of the Verdin family. The usual support of Toradex Easy Installer and Torizon are coming soon, meanwhile you'll learn how to install a Multimedia Reference Image for Yocto Project Software.
This module has mandatory and optional steps. In the mandatory steps you will:
In the optional steps you will:
The Verdin iMX8M Plus has been released on April 2021. As of this date, the software support for this Computer on Module is in an early stage of development and a few features are currently a work-in-progress:
Our teams are working at a fast pace to bring all of those features to you in the next weeks. To follow-up on the latest status, you can:
For this Quickstart Guide:
For this lesson:
Note: Carefully read this module's cover page clicking on "Module 1: Unboxing and Bring-up" on the left menu bar before starting this lesson.
Open a serial terminal communication to the board debug UART. In this guide, for those of you that are not familiar with the serial terminal, we'll use PuTTY, since it's a cross-platform and well-known GUI-based serial terminal emulator and SSH client.
In your host PC, install PuTTy:
$ sudo apt install putty
You can use the serial terminal emulator of your choice. Linux users hardly ever choose PuTTY and it is clumsy to use on Linux. There several options to PuTTY, such as Minicom, Picocom, GTKTerm and Screen. Try them and choose the one you prefer:
To avoid the need to run PuTTY using sudo, you can add your user to the dialout group. You can find your user name with the whoami command. To do it in a single-line, in your development PC, run:
$ sudo usermod -a -G dialout $(whoami)
To apply the changes, either reboot or log-off, and log-in.
Temporarily unplug the USB cable from X18, then list all available serial ports:
$ ls /dev/ttyUSB*
Plug the cable again and list all available serial ports again:
$ ls /dev/ttyUSB*
You will notice that four additional devices /dev/ttyUSBx show up. Choose the highest index. For example if /dev/ttyUSB0, /dev/ttyUSB1, /dev/ttyUSB2 and /dev/ttyUSB3 show up, you must use the ttyUSB3.
Start PuTTY, choose Serial, use the ttyUSB device found in the previous step and set the Speed to 115200, and click Open. If you have chosen to use other software than PuTTY, make sure to correctly set all of the Console Serial Parameters:
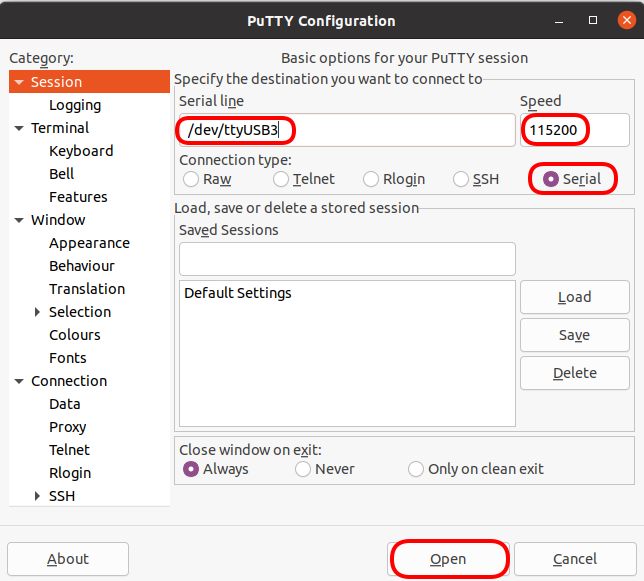
PuTTY Serial Configuration
Since the board is powered off, a screen will open but nothing will be printed:
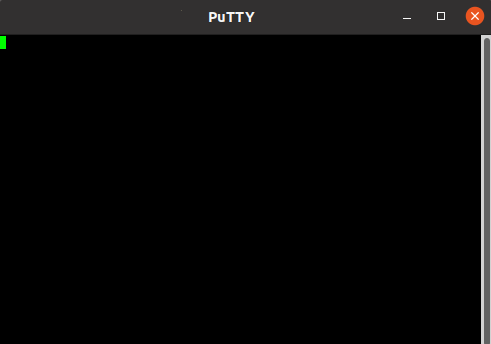
PuTTY Ready to Use
The Verdin iMX8M Plus comes with the Toradex Reference Multimedia Image for Yocto Project pre-installed. While you can entirely skip the next steps from this lesson, we strongly recommend that you compare the currently installed version with the latest one and update your board as described in the next steps.
Power on the board, you will be prompted for login. The user is root and there is no password. Run the following command:
$ hostnamectl
The output will be similar to the following:
   Static hostname: verdin-imx8mp
         Icon name: computer
        Machine ID: fedeaf57cd4e44e9aa6fe96b66a8475e
           Boot ID: 5775ef15d04a429db540a21f40b08bb3
  Operating System: TDX Wayland with XWayland 5.2.0-devel-202102+build.7 (dunfell)
            Kernel: Linux 5.4.91-5.2.0-devel+git.590db576d04d
      Architecture: arm64
The version is in the Operating System line. In our example, it is 5.2.0-devel-202103+build.0, or the March monthly release. Learn more about our versioning convention on the Toradex Embedded Linux Support Strategy.
Even if your computer on module is up-to-date, learning how to update the system image is useful as it will be required later on the Quickstart Guide when we talk about image customization. If you skip it for the moment, just remember to come back when the guide asks you to.
Press and hold the recovery switch (SW3). While the recovery switch is pressed, press and release the on/off switch (SW2). After 10 seconds, release the recovery switch:
Verdin Development Board Recovery Mode
If you need help or more detailed instructions, read our article iMX Recovery Mode - Verdin iMX8M Mini.
To load the U-Boot bootloader, you will need NXP's Universal Update Utility also known as uuu, available on the Snap Store:
Warning: you must have Snap installed in your OS. If you don't have it and don't want to have it, you may download the binary from the uuu GitHub releases. If you have questions about uuu not covered on this guide, you can read the uuu Wiki on GitHub.
$ sudo snap install universal-update-utility
$ sudo snap alias universal-update-utility uuu
$ sudo snap connect universal-update-utility:removable-media
Validate that uuu has been properly installed by listing the available devices. It will also validate that the board has properly entered recovery mode:
$ uuu -lsusb
You must see one device listed in the command output:
uuu (Universal Update Utility) for nxp imx chips -- libuuu_1.4.107-0-g9201dde

Connected Known USB Devices
    Path     Chip    Pro     Vid     Pid     BcdVersion
    ==================================================
    1:33     MX865   SDPS:   0x1FC9 0x0146   0x0002
If no device is listed, power-off the board and go back to the step that describes how to enter recovery mode.
Download the bootloader and the full image to be flashed to the device:
$ mkdir verdin-imx8m-plus && cd verdin-imx8m-plus
$ wget https://artifacts.toradex.com:443/artifactory/tdxref-oe-prod-frankfurt/dunfell-5.x.y/release/7/verdin-imx8mp/tdx-xwayland/tdx-reference-multimedia-image/oedeploy/imx-boot
$ wget https://artifacts.toradex.com:443/artifactory/tdxref-oe-prod-frankfurt/dunfell-5.x.y/release/7/verdin-imx8mp/tdx-xwayland/tdx-reference-multimedia-image/oedeploy/Verdin-iMX8MP_Reference-Multimedia-Image.rootfs.wic.bmap
$ wget https://artifacts.toradex.com:443/artifactory/tdxref-oe-prod-frankfurt/dunfell-5.x.y/release/7/verdin-imx8mp/tdx-xwayland/tdx-reference-multimedia-image/oedeploy/Verdin-iMX8MP_Reference-Multimedia-Image.rootfs.wic.gz
Warning: this step is tricky. If you fail, just power-off the board, enter recovery mode as described previously and try again.
Make sure you have the PuTTY terminal, and the Linux terminal from your host PC, side-by-side so you can quickly switch from one to another:

PuTTY and PC Terminals Side-by-side
With the board still in recovery mode, use uuu to load U-Boot into the RAM of the module. On your PC, run:
$ uuu imx-boot
Quickly switch the window focus to the PuTTY terminal and repeatedly press any key on your keyboard, for instance Space. It will stop the boot process, and you have 1 second to do it. See examples of success and fail:
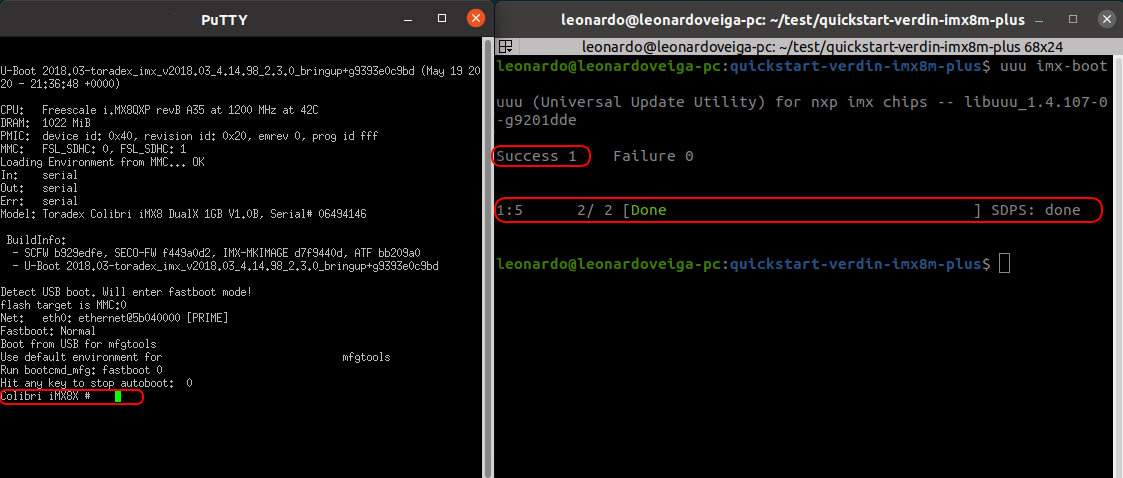
Successfully Stop the Boot Process and Reach the U-Boot Terminal
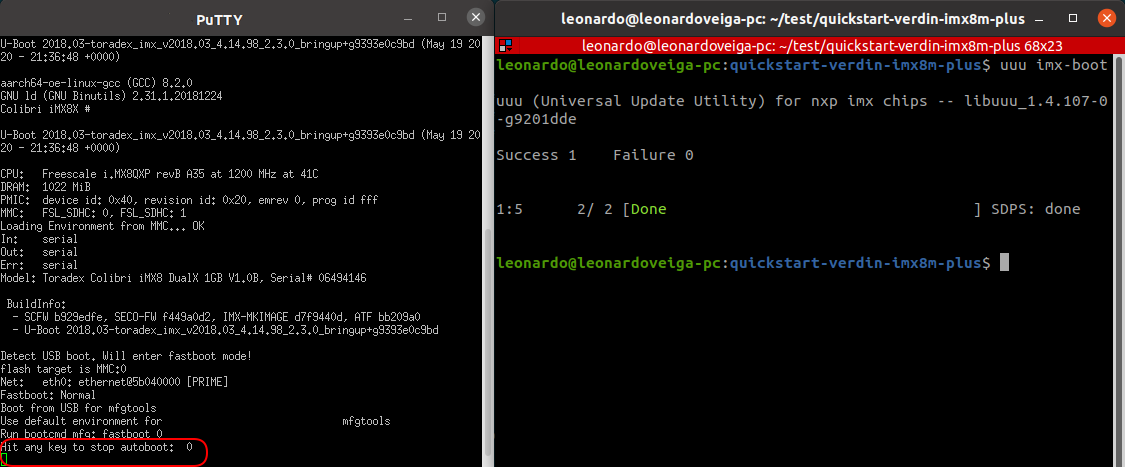
Fail to Stop the Boot Process
You will end up in the U-Boot command-line prompt, make sure you are able to run commands:
> version
List all block devices from your PC:
$ lsblk
Initiate U-Boot USB Mass Storage, also known as UMS:
> ums 0 mmc 2
Note that your PC will recognize the board as a mass storage device, such as an USB stick. List all block devices again, and you will notice that there is an extra entry. If you are using a regular Ubuntu LTS, among other distros, most likely it will be a /dev/sd* device and the mount point will be under /media. For example, on my PC it was listed as sde with partitions sde1 mounted on /media/user/BOOT and sde2 mounted on /media/user/root:
$ lsblk
NAME   MAJ:MIN RM   SIZE RO TYPE MOUNTPOINT
sda      8:0    0 232,9G  0 disk
├─sda1   8:1    0   487M  0 part /boot/efi
├─sda2   8:2    0   954M  0 part /boot
├─sda3   8:3    0  16,8G  0 part [SWAP]
├─sda4   8:4    0  46,6G  0 part /
└─sda5   8:5    0 168,2G  0 part /usr/local
sdb      8:16   0 931,5G  0 disk
└─sdb1   8:17   0 931,5G  0 part /home
sde      8:64   1  14,8G  0 disk
├─sde1   8:65   1  83,2M  0 part /media/user/BOOT
└─sde2   8:66   1  14,7G  0 part /media/user/root
Attention: make sure to get the correct device index! If you use the wrong index in the next steps, you overwrite data on some other device plugged to you PC.
Unmount the partitions listed under your block device. In my previous example, there were /dev/sde1 and /dev/sde2, but if you have /dev/sdX3 or more you will need to unmount them as well:
$ sudo umount /media/user/BOOT
$ sudo umount /media/user/root
Install bmaptool, which will be used to flash the image to the module:
$ sudo apt install bmap-tools
Use the previously downloaded files .wic.bmap and .wic.gz, and the block device previously found, as parameters to bmaptool:
$ sudo bmaptool copy --bmap Verdin-iMX8MP_Reference-Multimedia-Image.rootfs.wic.bmap Verdin-iMX8MP_Reference-Multimedia-Image.rootfs.wic.gz /dev/sdX
Progress percentage will be displayed as the command runs. See a sample output after the command finishes:
bmaptool: info: block map format version 2.0
bmaptool: info: 737316 blocks of size 4096 (2.8 GiB), mapped 235947 blocks (921.7 MiB or 32.0%)
bmaptool: info: copying image 'Verdin-iMX8MP_Reference-Multimedia-Image.rootfs.wic.gz' to block device '/dev/sde' using bmap file 'Verdin-iMX8MP_Reference-Multimedia-Image.rootfs.wic.bmap'
bmaptool: info: 100% copied
bmaptool: info: synchronizing '/dev/sde'
bmaptool: info: copying time: 1m 30.0s, copying speed 10.2 MiB/sec
Make sure everything has been copied. On your PC, run the following:
$ sync
The image is successfully installed! You can safely power-off the board and power-on again. In the PuTTY terminal, you will see the board boot to the Linux login prompty, and on the HDMI display you will notice that after the boot process, the sample application Qt5 Cinematic Experience will be launched.
On the PuTTY terminal, log in using the root user without a password:
# root
On the board, create the following text file with a partition template to be used by sfdisk:
 part-layout.txtlabel: dos
label-id: 0xfee3b193
device: /dev/mmcblk2
unit: sectors
sector-size: 512

/dev/mmcblk2p1 : start=       16384, size=      170392, type=c, bootable
/dev/mmcblk2p2 : start=      196608, size=    30883840, type=83
You can use vi to create the file, or run the command below:
# printf "label: dos\nlabel-id: 0xfee3b193\ndevice: /dev/mmcblk2\nunit: sectors\nsector-size: 512\n\n/dev/mmcblk2p1 : start= 16384, size= 170392, type=c, bootable\n/dev/mmcblk2p2 : start= 196608, size= 30883840, type=83\n" > part-layout.txt
Verify that the file has been created successfully:
# cat part-layout.txt
Resize the Linux partition so you can use the entire capacity of the internal flash.
# sfdisk --no-reread /dev/mmcblk2 < part-layout.txt
# reboot
# resize2fs /dev/mmcblk2p2
# rm part-layout.txt
You can check the output of the full commands:
You will have access to the Linux terminal on PuTTY and your device storage capacity will be using the entire flash memory.
